What's new?
This page will pop-up from time to time to keep you informed of system changes we make.
05-02-2024
Bee Connect payment processor added
If you are using our online booking system, you may now take payments via Bee Connect, who use the Monek online system. Go to beeconnect.tech to set-up your account. They will give you various access codes that you enter in the Control File on your website.
22-12-2023
Stripe payment processor added
If you are using our online booking system, you may now take payments via Stripe. Go to stripe.com to set-up your account. They will give you various access codes that you enter in the Control File on your website. Stripe fees are 1.5% + 20p.
09-02-2023
Easy to use online ticketing
Sell tickets to your event at any time of the day or night, on any device
Events are simple to set-up - there's plenty of friendly help and support online and by phone and Zoom
You take the money for your event directly using your own account with your own card provider
See full details on the Ticket-Bytes website www.ticketbytes.co.uk
14-12-2022
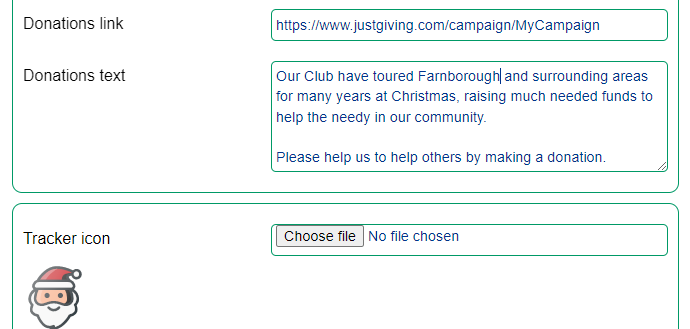
Rota donations
Those who have our Rota (Schedule) system may now add text and a link inviting the public to make a donation. They appear below the map and table showing Santa's whereabouts.

28-10-2022
Scanning QR coded tickets and vouchers
All current members and guests can login to the TicketBytes App but for security you may wish to allow only specific groups to scan tickets/vouchers for a particular event. This can also be useful when you have more than one event active at the same time to save any confusion.
The first thing to do is ensure your scanning volunteers are part of a group (Position) in the Member Database e.g. Registration and the From/To dates cover the event date. You may then edit the Event and select the group in the Scanning restricted to drop-down list. You may select Not set to allow any current member or guest to scan tickets when logged in.
Admin users and Event owners always have access and can also view past events whereas others have no access after the event.
18-07-2022
Horizontal rule
When you have a lengthy page such as this one, it's often useful to keep each section separate with a "horizontal rule" line across the page. The standard rule is a bit heavy so we have created a lightweight one as shown here. Just use the editing control ![]() (next to the anchor) to insert it.
(next to the anchor) to insert it.
23-05-2022
PDF thumbnails
At present, when you upload a PDF document, an icon and a link are inserted into your web page for easy downloading:
This new function will create a thumbnail of the first page of the document and insert it into your web page for you. If you would like a larger thumbnail image, use the normal image resizing controls. You may also delete the image if not wanted. A link to download the PDF will be in the thumbnail as well as the icon and file name.
Update 19-07-2022
If you don't want the thumbnail, you may remove the relevant tick in the "Navigation and page controls" section of the Control File:

12-04-2022
QR coded tickets
If you are using our online ticketing system for your events and create QR coded tickets for speedy entry to your event, you may now set the system to produce instant links to enable your customers to immediately download their tickets. This saves issues with tickets sent by email ending up in your customer's junk folder.
On completion of the transaction your customer normally sees a "Thank you" message but will now see the following, however you may turn off this feature on an event by event basis.

QR coded tickets may be scanned using our TicketBytes App so that your customers may be scanned in and out of your event speeding up entry and saving the cost of printing tickets. The App is available on the App Stores for installing on each of your ticket taker's mobile phones. If you would like to use our TicketBytes system, it is available at extra cost.
11-01-2022
Uploading a file using the Contact Us page
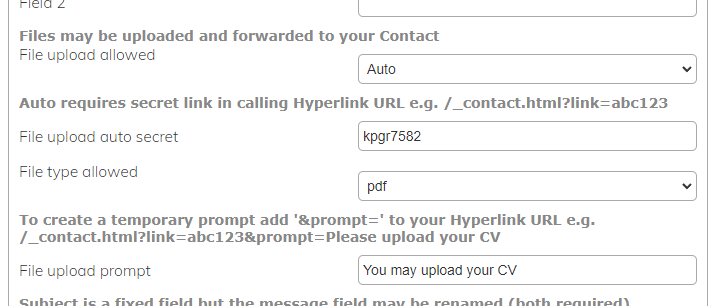
You may now upload a file using the Contact Us form. This might be useful for uploading a CV or a photo. For security, only PDF, JPG and PNG files may be uploaded. In the Control File - Contact Us section, there are various controls as shown below.
In order to use the Contact Us form as normal but allow file uploads only if linked to from, say, a recruitment page, there is an Auto option. Your recruitment page might advertise a job and have a link such as "Apply now". When you create that link, in the Hyperlink dialogue you might enter "/_contact.html?link=secret" to switch on the file upload form field when your visitor lands on the Contact Us page.
Contact Us form

Part of the Control File

What the controls mean
| Fields | Values | Notes |
| File upload allowed | Select No (default) or Yes or Auto | Yes allows uploads at all times - probably not a good idea for general enquires. Auto only allows uploads if you link to the Contact Us page from another page with "/_contact.html?link=secret" |
| File upload auto secret | Best to enter random characters | This isn't particularly secure but is a simple method of allowing page Editors to switch on file uploads |
| File type allowed | Select pdf or image | Only PDF files or JPEG/PNG images may be uploaded |
| File upload prompt | Enter your prompt | If you would like a different prompt when linking from a particular page, add it to your Hyperlink e.g. "/_contact.html?link=secret&prompt=Please upload your photo" |
30-11-2021
Ticklist updates
The Ticklist has been updated to display the heading as you scroll down so that you don't lose track of which column does what. The table that is sent as part of any email has been reduced to a single column - multi columns often overflow the page. The Owner drop-down list has been constrained to members only - previously everyone in the database was listed. If your Ticklist prints on two or more pages, the table heading will also be printed on secondary pages.
28-10-2021
Page updated display
The date of the last page update may now be displayed in the footer. When logged-out, the display is simply Updated:31‑12‑2021 (date only) but when logged-in, the display is either Updated:31‑12‑2021 12:59 (date and time) or if the page has been edited but not yet published Updated:31‑12‑2021 12:59:59 (date and time including seconds).
The date only appears on editable pages (not Contact Us for example) but you may turn it off in the Control File in the Navigation section.
13-09-2021
Events calendar - filter and CSV export
If your events calendar has lots of entries, your visitors may now filter the list to display only the entries they are interested in. It can also be useful when editing, where you wish to duplicate an existing event but cannot find it.

Sometimes you may wish to export the entire calendar data for import into another calendar or for processing using Excel or similar. There is now a link below the events table allowing you to firstly prepare the data and then download it.

The CSV created will be in this format:
"Date","Subject","Description","Location","Start Date","Start Time","End Date","End Time","Private"
"2021-09-19","Committee meeting","","Zoom","09/19/2021","07:30:00 PM","09/19/2021","09:30:00 PM","on"
"2021-09-26","Websites Workshop","training.html","Pembroke House, St Christophers Place, Farnborough GU14 0NH","09/26/2021","10:00:00 AM","09/26/2021","02:30:00 PM",""
In order to make full use of this if importing into another calendar, ensure you enter times either in 24 hour format (19:30) or add AM/PM as appropriate (7:30pm).
A start and end time may be entered as 11:00am to 1:00pm or 11:00am - 1:00pm
09-04-2021
PDF links in pages
If you upload a PDF to a public page or a private page in the Members area, a link will be automatically created making it easy for users to download and display the PDF.
If you've already uploaded the file via the Private Files or Public Files tables, you can upload again with the same filename. However, if you have lots of files to link, you may simply type in the exact filename in your page e.g. My_File.pdf and save the page. If the file exists, a link will be created.
Upper/lower case is important and files with spaces in the name won't be found.
You'll have to click the ![]() "Edit off" padlock to test the link.
"Edit off" padlock to test the link.
It's a bit tedious typing in the filenames if you have a lot to do, but you could have two windows open and copy/paste or drag/drop from the Public/Private Files list.
Make sure you publish the page so that all users can access it.
08-04-2021
Contact Us update
Via the Contact Us form on the Squarezone website, we recently received a lot of spam email from one source that mentioned lifemail.studio in the text. This is a known spam email company. That particular issue should now have been eradicated but it prompted us to add a link to the bottom of all Contact Us emails that you will receive, allowing you to report the email as spam. Obviously you shouldn't use this if you receive a genuine approach for some item or service that you simply aren't interested in because that sender will be blacklisted for all Squarezone Club-Sites users.
We do have spam catchers in place on the Contact Us form and you'd probably be surprised to hear that we get over 300 messages a day in the traps. This is paid work for some but as most are porn related, we certainly don't want to see it.
If you receive junk that becomes a menace, please forward it to sales@squarezone.co.uk for us to deal with.
On a positive note
There have also been a few more positive changes to the Contact Us system:
- If you change the Contact Heading, it will appear on the menu instead of Contact Us. Do keep it short!
- The label on the Message box defaults to Brief Message * but may be changed e.g. Your Question *
- The additional form fields may now be "Required" by adding a trailing asterisk e.g. Your Town *
All of this is set-up in the Control File and the layout of that has been improved with a few helpful notes added.
You can turn off the Contact Us form altogether if you have no need of it.
28-01-2021
Sticky menus
 When scrolling down a long page, such as this one, the menu will stick to the top to make navigating to another page much easier - try it now. If you wish to switch off this feature, go to the Manage Control File page and in the Navigation box, deselect the Sticky menus checkbox.
28-01-2021
Member Database viewing/emailing system
You may view a list of members of a committee or group and optionally email them using a simple form. As the website Admin user, this functionality has been available for some time.
 However, in the Members' Pages box of the Manage Control File page, if you tick the box Email setup, Editors and Members will also be able to view/email groups and view the contact details of other members.

Being able to send nicely formatted emails from the website is a major benefit to members. Emails are sent from username@your.domain not from a private email address and importantly there is no limit on the number of recipients. Each email is sent separately and addressed to the individual as "Hi Tom". It saves email avalanches when members hit "Reply all" if you forget to Blind Copy (Bcc) them.
Sorry, this function is not available unless you have the Member Database system.
03-12-2020
Where's Santa?
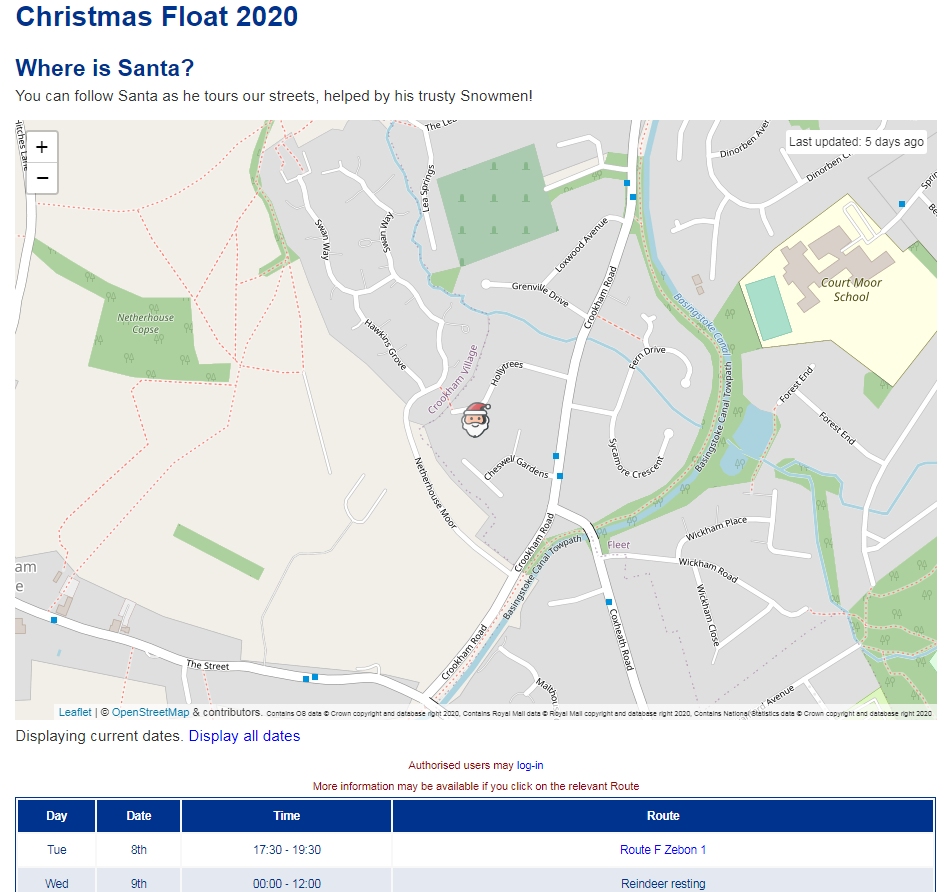
Those who have our Rota (Schedule) system and wish to add a Tracker function, may now easily set-up a mobile phone to act as the transmitter of GPS location so that the general public may follow progress on a moving map. Please see www.fleetlions.org.uk/rota for a live example that will run during December.
![]() There are many more uses for a tracker, other than waiting for Santa and the system is totally flexible.
There are many more uses for a tracker, other than waiting for Santa and the system is totally flexible.
If you were to use the Rota for allocating manpower for Fireworks Night, each team member could set their mobiles to transmit and the team leader could instantly see where they are.
The Tracker key ensures that only your member's mobiles may act as transmitters.
The Tracker title and Tracker text are displayed on the tracker page.
You may upload your own Tracker icon (map marker icon).
Example page

09-11-2020
Further update to the Contact Us system to allow the menu entry to be hidden - effectively removing the Contact Us facility. Admin user can log-in and go to Manage the Control File and simply enable or disable the Contact Us system.

22-10-2020 Contact Us update
The Contact Us system has been updated to display a formatted email and also to ensure delivery of the email if your mailbox is not on our own servers. Where you have more than one recipient of the Contact Us form email, all recipients will be able to see the other recipients' email addresses.
13-08-2020 Password Reset
The Password Reset facility will now keep you logged in after you click the special link in the email that the system sends you and then set a new password.
When you do set/reset your password, it will be checked against a long list of known compromised passwords and you will be informed if your chosen password is on that list.
17-05-2020 TickList email facility
You can now email all members on a TickList if you are the Admin user or own the TickList.
05-05-2020 Covid-19 Update
We hope you and your families are keeping safe.
Whilst some staff have been furloughed Tom Sayers and Juliet Browne are working as usual so if you have any queries please don't hesitate to ring us (during office hours) or email us - we're happy to help.
26-03-2020 Gallery enhancement
If you name an Album so that it contains a member's name e.g. "Any text Tom Sayers any text", that member may log-in and edit their own Album. No other member may edit the Album except the Admin user who has overall access. The member level must be set to Editor.
24-02-2020 Security update
If you are using the Member Database, which contains a lot of personal information, you may now secure logins using Two Factor Authentication (2FA). If you are using the Email Forwarding Table, 2FA is not available.
Two Factor Authentication
Two factor authentication (2FA) is an extra layer of security when logging into this website and may soon become mandatory for Admin users. Even if your password is stolen or you have a weak password, 2FA will stop unauthorised access. You still need your username and password when you log-in.
We are using two methods of authorisation.
1. Time-based One Time Password (TOTP)
You will be asked to provide a six digit code generated by an app running on your mobile phone or tablet. These codes are changed every 30 seconds.
There are several apps available for free - just search for 2FA on the Play Store or App Store. You may already be using 2FA for another website and if so, you will be able to add this website to your authenticator app.
2. WebAuthn Security Key
This is similar to TOTP but the secret codes are generated by a physical USB key using standard WebAuthn security. Essentially you will be asked to insert your security key in a USB socket on your computer each time you login but you won't have to enter a six digit code. If you already have a WebAuthn key, you will be able to use it on this website. Keys are available online from £7 upwards - search for FIDO2.
Backup
When you register to use 2FA you will be given 10 backup codes (each may be used once only). Should you be unable to use your app or key, you will be able to enter a backup code to gain access.
More information
Go to your Members Database and scroll to the bottom for full usage details and examples.
10-05-2019 Photograph credits
Previously crediting a photo required you to create a caption, and right justifying it. This meant you couldn't right justify the caption without inadvertently adding the "Image courtesy of:" hover text. We decided that it would be better if captions and credits were separate functions for this reason.
Create a credit within the image using a new button ![]() on the Image settings dialogue that appears in the Control Panel when you click on an image.
on the Image settings dialogue that appears in the Control Panel when you click on an image.
 Tom and Juliet
- Click on an image
- Click on the Credit icon

- A box will prompt you to enter the name to accredit
- The name you entered will then appear within the image
- If you mouse over the name, it will display "Image courtesy of:" before the name
- Click on the image and then click the Credit icon again to remove the credited name
03-01-2019 Three column layout container
- Click in the page or a paragraph you want to be in the first column.
- Click on the Column icon

- You will see three boxes with dotted blue edges, similar to a table.
- If you were in a paragraph, the first column will now have that text embedded.
- Click into one of the columns and click the Delete Column icon
 the columns will be removed, but the content will be kept on the page.
27-11-2018 Captions (Updated 10-05-2019)
Create a caption below images using a new button ![]() on the Image settings dialogue that appears in the Control Panel when you click on an image.
on the Image settings dialogue that appears in the Control Panel when you click on an image.

- Click on an image
- Edit the Title if necessary - this will become your default caption
- Click on the Caption icon

- The text from the Title will appear below your image
- You may use normal editing features on the caption e.g.
 centre it
 - You may add to or change the caption text but it will be lost if you delete the caption
- Click on the image and then click the Caption icon again to remove the caption text
- You may add more captions by cancelling the remove prompt at which point you'll be asked if you want to add more captions.
22-11-2018 File uploads
Inserting a PDF or DOC or XLS file in your page usually means:
- Uploading the file to the Public folder
- Copying the link to that file
- Returning to the page you were editing
- Highlighting some text and applying the link to it
Now you can insert your document just as easily as you do images:
- Select your document using the or button
- If you have selected a document, the image icon
 will disappear, leaving the file link icon
- Click in your page where you want to insert your document
- Click on the file link icon
 and save
  your page
 - Your document will be uploaded and saved in the public files folder or private files folder if you are editing a Members only page
- A clickable icon and link will be inserted in your page
- e.g.
 filename.pdf
 - Done!
If you upload a video or an audio file, an HTML5 video or audio player will appear, allowing your visitors to view the video within your page or play the audio.
To view this page again, look for What's New on the Control Panel


